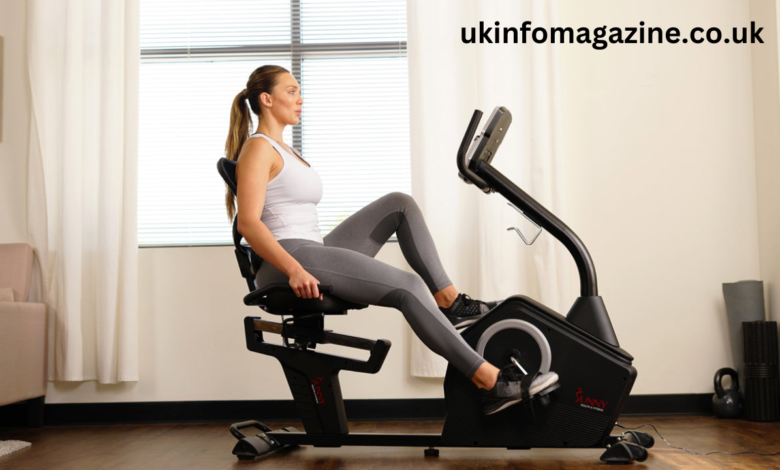
When it comes to stationary bikes, the recumbent bike has gained widespread popularity due to its comfortable and ergonomic design. Unlike traditional upright bikes, stationary recumbent bike fitting allow users to sit back in a more relaxed, laid-back position with the pedals positioned in front of the body. This unique design offers many benefits, including reducing strain on the back and joints, especially for individuals with mobility or injury concerns. However, to fully reap the benefits of your recumbent bike and prevent discomfort or injury, it is crucial to ensure that the bike is properly fitted to your body.
Proper bike fitting on a stationary recumbent bike doesn’t just ensure comfort, but it also optimizes your workout efficiency and prevents long-term strain. A correct fit helps with maintaining the correct posture and biomechanics, allowing you to pedal without overexertion. This guide will walk you through everything you need to know about fitting a stationary recumbent bike, from adjusting the seat and handlebars to fine-tuning the pedal settings. Whether you’re a beginner or a seasoned rider, this comprehensive guide will ensure that your workout experience is as comfortable and effective as possible.
1. Why is Proper stationary recumbent bike fitting Important?
Before diving into the specifics of fitting your recumbent bike, it’s important to understand why proper fitting matters.
Reduces Risk of Injury
Proper bike fitting is essential for minimizing the risk of injury, especially over longer rides. Incorrect posture or improper adjustments can lead to issues like lower back pain, knee strain, or muscle imbalances.
Increases Comfort
One of the key benefits of a stationary recumbent bike fitting is the comfort it provides, thanks to the supportive seat and backrest. A well-fitted bike will allow you to enjoy your workouts without discomfort, ensuring that you can stay on the bike for longer periods of time.
Enhances Pedaling Efficiency
By adjusting the bike to suit your body mechanics, you improve your pedaling efficiency. The right fit ensures that you are using the correct muscle groups, allowing you to conserve energy and get more out of each workout session.
Prevents Overuse Injuries
When a recumbent bike is not properly adjusted, you may unconsciously compensate with bad posture or improper pedaling technique. This can lead to overuse injuries over time, including hip, knee, or ankle strain. Proper fitting helps maintain good form and minimizes unnecessary stress on your joints.
2. Key Areas to Focus on for a Proper stationary recumbent bike fitting
There are several areas that need to be adjusted for an optimal recumbent bike fit. These adjustments help ensure that your body is in a comfortable, efficient position. Let’s break down each area:
a. Seat Height and Position
The most important factor in bike fitting is the seat position. Getting the seat height and fore-aft position correct will directly impact your comfort and pedaling efficiency.
Seat Height Adjustment
On a stationary recumbent bike fitting, the seat height is determined by the distance from the pedals to your body while sitting. The goal is to position the seat so that when you pedal, your knees have a slight bend at the furthest extension.
- Correct Knee Position: When the pedal is at its furthest point, your knee should be slightly bent (about 15–25 degrees). If your leg is fully extended or if your knee is excessively bent, you may strain your knee or hip.
- Testing Seat Height: Sit on the bike and place your feet on the pedals. Rotate the pedals until they are at their lowest and highest points. At the lowest point, your knee should have a slight bend, not be locked straight. If it’s too straight, move the seat up. If it’s too bent, move the seat down.
Fore-Aft Position Adjustment
The seat’s position (fore-aft) is just as crucial. A poor seat position can lead to discomfort, inefficient pedaling, and strain on the knees.
- Proper Alignment: The seat should be adjusted so that when the pedals are at their furthest extension, your knees are either directly above the pedals or slightly behind them. A simple way to check this is by placing a vertical line through your kneecap while the pedal is in the 3 o’clock position. Your knee should align with this line or be slightly behind it. This alignment reduces unnecessary stress on the knee joint.
- Fine-tuning: Test the seat position by pedaling. If you feel excessive strain on your knees or lower back, adjust the seat forward or backward as necessary.
b. Backrest Adjustment
The backrest on a recumbent bike is one of the standout features that set it apart from traditional upright bikes. It provides extra support for your lower back and helps maintain good posture during your workout.
Previous article; Garth Brooks Makeup Artist Behind the Scenes of a Superstar’s Look
Ideal Backrest Position stationary recumbent bike fitting
The backrest should be adjusted so that your lower back is supported, preventing your pelvis from tilting too much. Ideally, you want to maintain a neutral spine, with a slight curve in the lower back.
- Seat Angle: Depending on the bike model, the angle of the backrest may be adjustable. Adjust the angle to a position where your back feels supported and you’re not slouching. A slight recline (around 100–110 degrees) is typically most comfortable for most people.
- Testing for Comfort: Sit back in the seat, ensuring that your lower back is comfortably supported. You should not feel any excessive pressure on your spine or lower back muscles. If you do, try adjusting the backrest or switching to a bike with more lumbar support.
c. Pedal Straps and Foot Placement
Pedal straps keep your feet secure while pedaling. Improper foot placement can lead to discomfort or inefficient pedaling.
Foot Placement
Your feet should be positioned in such a way that your toes remain pointing forward and your heels don’t slide off the pedals.
- Proper Alignment: Make sure your feet are centered on the pedals. Your toes should face forward, and your feet should remain flat throughout the entire pedal stroke. If your feet shift or slide, this can lead to instability or discomfort.
Pedal Strap Fit
The pedal straps should be tightened enough to hold your feet in place, but not so tight that they cause discomfort or restrict blood flow.
- Testing the Fit: Adjust the straps to ensure that your feet are secure, but not too tight. You should be able to slide your feet in and out with a bit of resistance, without it being painful.
d. Handlebar Positioning (If Adjustable)
While the primary focus of a stationary recumbent bike fitting design is comfort, the handlebars (if available) should still be adjusted for optimal reach and comfort.
Proper Handlebar Adjustment
If your recumbent bike comes with adjustable handlebars, you should make sure they are positioned at a comfortable height and distance from your seat. Your arms should be slightly bent, and your shoulders should remain relaxed throughout your workout.
- Avoid Overreach: Your elbows should not be fully extended or too tight when gripping the handlebars. A slight bend in the elbows promotes relaxation and minimizes muscle strain.
e. Pedal Length or Crank Arm Adjustment
Some stationary recumbent bikes offer the ability to adjust the length of the crank arms (the arms that connect the pedals to the bike).
Optimal Crank Arm Length
Crank arm length determines how far your feet travel during each pedal stroke. The wrong crank arm length can lead to knee strain or inefficient pedaling.
- Adjusting for Comfort: The ideal crank arm length varies depending on the rider’s leg length. Generally, shorter crank arms are better for people with shorter legs, while longer crank arms suit those with longer legs.
- Test for Comfort: Try different crank arm lengths to see which feels most natural to you. Your knees should not feel overextended or too cramped during the pedaling motion.
3. Test the Fit and stationary recumbent bike fitting
Once you’ve made the necessary adjustments, it’s important to test the bike fit by taking it for a short ride. As you pedal, pay attention to any areas of discomfort or strain. If anything feels off, make small adjustments until everything feels right.
Fine-Tuning:
- Knee Discomfort: If your knees feel strained, try adjusting the seat height or position. A slight adjustment can make a big difference in comfort.
- Lower Back Discomfort: If your lower back starts to ache, adjust the backrest or try a slight recline.
- Legs Feeling Too Tense: If your quads or calves feel overworked, consider lowering the seat slightly or shortening the crank arms.
4. Additional Tips for Recumbent Bike Comfort
Invest in Cushioned Apparel
Consider investing in padded cycling shorts or a cushioned seat cover for additional comfort. These accessories can make long rides even more comfortable.
Take Breaks
While the recumbent bike is generally more comfortable than upright bikes, it’s still important to take regular breaks during long workouts. Stand up, stretch, and walk around to avoid muscle fatigue.
Regular Adjustments
As your fitness level or body changes, you may find that certain adjustments need to be re-evaluated. Regularly check your bike fit to ensure that it’s still optimized for comfort and performance.
Conclusion
Stationary recumbent bike fitting is key to unlocking an efficient, comfortable workout. Whether you’re a seasoned cyclist or a beginner, paying attention to the seat, backrest, pedals, handlebars, and crank arm length will help prevent injuries and ensure that you enjoy every ride. Take your time to make these adjustments, test the fit, and fine-tune until everything feels just right. With the right recumbent bike setup, you can maximize your workout efficiency, minimize discomfort, and enjoy a pain-free fitness journey.