Dimmer switches are an excellent addition to any home. They allow for better control over lighting, enabling you to adjust brightness according to mood, task, or time of day. One popular option is the single pole push dimmer switch dial ge instructions, particularly models manufactured by General Electric (GE). This guide will walk you through everything you need to know about the installation and operation of a single-pole push dimmer switch.
Understanding the single pole push dimmer switch dial ge instructions
A single-pole switch is designed to control a light fixture from one location. When paired with a dimmer function, it provides adjustable lighting levels instead of the binary on/off setting of traditional switches. The “push” feature refers to the switch’s mechanism—lights are turned on and off by pressing the dial, and the brightness is adjusted by rotating it.
Tools and Materials Needed for Installation
Before beginning the installation, gather the following tools and materials to ensure a smooth process:
- A voltage tester or multimeter
- A screwdriver (flathead and Phillips)
- Wire stripper and cutter
- Electrical tape
- Wire nuts
- The GE single pole push dimmer switch dial ge instructions
- A compatible wall plate
- Safety gloves
Safety Precautions
- Turn Off the Power: Before working on any electrical circuit, switch off the power at the circuit breaker. Label the breaker to prevent accidental reactivation.
- Check for Voltage: Use a voltage tester to confirm there’s no power flowing to the switch you’re working on.
- Wear Protective Gear: Safety gloves and goggles can protect against unexpected hazards.
- Follow Local Electrical Codes: Ensure your work complies with local building and safety codes.
Step-by-Step Installation Guide
1. Prepare the Workspace
- Locate the light switch you intend to replace with the dimmer switch.
- Remove any furniture or obstacles for easy access to the switch box.
2. Remove the Existing Switch
- Unscrew the faceplate using a flathead screwdriver and set it aside.
- Unscrew the mounting screws holding the existing switch in the electrical box.
- Carefully pull the switch out to expose the wires. Do not let the wires touch.
Previous article; Ctrail new train Revolutionizing Modern Transportation
3. Identify the Wires single pole push dimmer switch dial ge instructions
Inside the switch box, you will find:
- Line wire (black): Supplies power from the circuit breaker.
- Load wire (black or red): Transfers power to the light fixture.
- Ground wire (green or bare copper): Provides a path to ground in case of a short circuit.
- Neutral wire (white): This wire may not always be present in older installations but is required for some dimmers.
4. Confirm Power is Off
- Use the voltage tester to confirm all wires are de-energized.
- If the tester detects current, go back to the breaker box and ensure the correct circuit is switched off.
5. Connect the Dimmer Switch
- Ground Wire: Connect the green ground wire from the dimmer switch to the bare copper ground wire in the electrical box. Secure with a wire nut.
- Line Wire: Attach the black wire from the dimmer switch to the line (hot) wire in the box. Secure with a wire nut.
- Load Wire: Connect the red wire from the dimmer switch to the load wire from the box.
- Neutral Wire (if applicable): If your dimmer switch includes a neutral wire, connect it to the white neutral wire in the box.
Ensure all connections are tight and wrap each with electrical tape for added safety.
6. Mount the Dimmer Switch
- Carefully tuck the wires back into the electrical box.
- Align the single pole push dimmer switch dial ge instructions with the mounting holes and secure it using the provided screws.
- Attach the new faceplate to complete the installation.
7. Restore Power
- Turn the breaker back on and test the functionality of the switch.
- Push the dial to turn the light on or off, and rotate it to adjust the brightness.
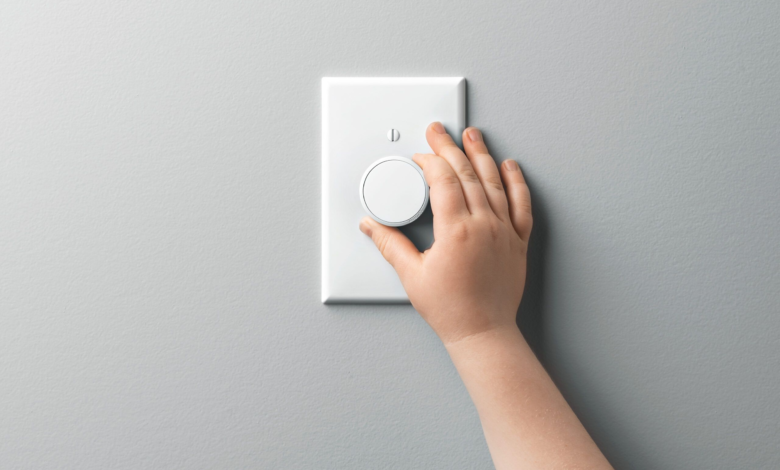
Operating the Single Pole Push Dimmer Switch
Using the dimmer switch is straightforward:
- Turning Lights On/Off: Push the dial to toggle the lights.
- Adjusting Brightness: Rotate the dial clockwise to increase brightness and counterclockwise to dim the lights.
- Set the Desired Level: Release the knob once you’ve achieved the preferred lighting intensity.
Benefits of Using a Dimmer Switch
- Energy Savings: Dimming the lights reduces energy consumption, leading to lower electricity bills.
- Extended Bulb Life: Operating lights at reduced brightness extends the lifespan of your bulbs.
- Customizable Ambiance: Easily create the right mood for any occasion.
- Reduced Eye Strain: Dimmed lighting is easier on the eyes, especially in the evening.
Troubleshooting Common Issues
Problem 1: The Lights Flicker
- Cause: Incompatible light bulbs or loose wiring.
- Solution: Ensure you’re using dimmable LED or incandescent bulbs compatible with the dimmer switch. Tighten all wire connections.
Problem 2: The Dimmer Gets Warm
- Cause: Dimmer switches generate heat during operation, especially at higher loads.
- Solution: Ensure the total wattage of connected bulbs does not exceed the dimmer’s rated capacity.
Problem 3: The Switch Does Not Work single pole push dimmer switch dial ge instructions
- Cause: Incorrect wiring or a tripped breaker.
- Solution: Double-check your wiring connections and reset the circuit breaker if needed.
Tips for Optimal Performance
- Use Compatible Bulbs: Always use dimmable bulbs that are recommended by the dimmer switch manufacturer.
- Avoid Overloading: Do not exceed the wattage limit specified for the dimmer switch.
- Periodic Maintenance: Check wire connections periodically to ensure they remain secure.
When to Call an Electrician
If you encounter any of the following scenarios, it’s best to consult a licensed electrician:
- The wiring in your home is old or does not meet current standards.
- You’re unsure how to identify or connect the wires.
- The dimmer switch does not function after installation, even after troubleshooting.
Conclusion
Installing a single pole push dimmer switch dial ge instructions is a simple yet effective way to enhance your home’s lighting system. By following this step-by-step guide, you can safely install and operate your GE dimmer switch to enjoy adjustable lighting and energy savings. Remember to prioritize safety throughout the process, and don’t hesitate to seek professional assistance if needed. With proper installation, your dimmer switch will provide convenience and ambiance for years to come.